Saturday, October 30, 2010

What I've Been Up To

I do hope everyone has a wonderful weekend.
Here in Arizona it's a beautiful 77 degrees.
Not a cloud in the sky and not a day for sitting
in front of a
computer.
But here I am...

I've been busy.
Too busy.

Here are a few of the things
That have captured my attention.


Gotta keep that Etsy Shop stocked!

Sew Happy,
Suzie

Friday, October 29, 2010

Fiber Friday -- Bamboo

There has been a real surge of bamboo in the clothing/textile industry of late. I, for one, knew little about bamboo and its properties. I have seen it in the fabric stores and even was tempted to purchase some yarn because it is SO soft. I could easily imagine something soft and cozy knit up in this yarn. Bamboo has intrigued me enough to do a little research on it and I came up with some interesting facts.


*Bamboo is classified as a grass. It is the fastest growing grass on the planet growing an average of a yard a day and once harvested, grows back very quickly. It grows naturally without the benefit of fertilizers or pesticide making it a very eco-friendly plant to grow.

*However, while the bamboo itself is eco-friendly, the method of processing isn’t necessarily so. Harsh chemicals can be used in its processing. Once harvested, the fiber is “cooked” using chemicals such as sodium hydroxide and carbon disulfide into a viscose (golden-brown solution) and then restructured into a yarn suitable for weaving/knitting. While there are processes being established to lessen the use of chemicals in the manufacturing of bamboo that will hopefully replace this method, it is still used and is considered cost effective in providing bamboo products to the consumer. Hence, bamboo textiles really are not all that eco-friendly.

*The alternative method of processing is done mechanically much in the same way linen fibers are harvested from flax, removing the fibers from the plant, breaking down the enzymes that hold the fibers together and then combing out the fibers for spinning. Even though this is eco-friendly, it is labor intensive and, therefore, much more expensive to produce meaning a much higher priced item for the consumer which, from what I gather, is the reason the chemical method is preferred.

*Bamboo is 100% biodegradable even with chemical processing. In fact, it often improves the soil quality.

*Fibers are light and strong, take dye easily and have a natural UV protection.

*Bamboo has anti-fungal, anti-bacterial properties and is considered hypoallergenic and a good fabric for those with sensitive skin.

*Bamboo is highly absorbent – 3-4 times more wicking ability than cotton.

*Easy to launder and maintain.

Sew Happy,
Suzie

Tuesday, October 26, 2010

Hoo Am I?

NightOwlCrafting


This week's questions....
1. How many times a year do you get your hair cut?  3-4 times a year...I'm rather lazy about that.


2. Where is the worst place to be stuck waiting?  Dentist's office....I hate everything about dentists.

3. What are your favorite pizza toppings?  Alfredo sauce and chicken

4. What's your favorite thing about where you live?  The really mild winters (Arizona)

5. What's your favorite fruit? Strawberrries Veggie? Potatoes

Head over the Night Owl Crafting and see hoo others are too....

Sew Happy,
Suzie

How to Take Body Measurements -- A Brush-up Course

It never hurts to brush up on taking body measurements from time to time.  If you are new to sewing, these are must-know skills for succesfull fitting.  Here are some tips to help taking body measurements and how to decide on what size of pattern to use.


To make accurate measurements, you will need…

• A buddy – someone to take your measurements for best accuracy. You will not be able to measure yourself accurately at all.

• Dressmaker’s tape measure. Invest in a nice one. Cloth tape measures stretch over time so avoid those.

• Piece of string big enough to go around your waist

• Paper to record measurements

• Pencil

Make sure to…

• Take off your shoes

• Wear only your undergarments. Measuring over clothing adds to the measurement.

• When measuring, the tape measure should be snug not tight

• Take your measurements often to allow for body changes

Main Measurements

• Bust

• Waist

• Hips

• Back Waist Length

• Height

Measure The Bust

• Measure over the fullest part of bust, high under arm, straight across back

• Make sure measuring tape needs to be horizontal with the floor

• Take this measurement again when you wear a bra other than your everyday bra. Bras stretch over time and support may not be the same from bra to bra. This will made a difference, trust me. If you are taking measurements to prepare for a special occasion dress/outfit, wear the bra you plan to wear with that outfit.

• Record the measurement

Find The Natural Waist

• Tie a string around your waist snuggly yet comfortable

• Bend to each side

• The string will move into your natural waist

• The string does not need to be horizontal to the floor

• Stand up straight

• Measure over the string exactly where it is

• Don’t hold your breath or pull tape too tight. This will give you too tight a measurement.

• Record this number

• Leave the string in place

Measure The Hips

• Measure the fullest part of low hip, not across the hip bones

• Stand straight with feet together

• Tape measure should be horizontal with the floor

• Measure snug not tight

• Record this number

Back Waist Length

• Measure from top of the prominent bone at base of neck to natural waistline (string)

• Stand straight, shoulders back and do not look down

Measure Height

• Shoes off

• Heels against wall

• Shoulders back

• Chin up

• Place mark on wall

• Measure from mark to floor

Remember…

Pattern sizes are not the same as retail clothing sizes Don’t panic if the size number you measure to is not the same as off-the-rack clothing. Pattern size is just a starting point. Get correct body measurements, select the correct size and choose the pattern size with the measurements closest to your own.

• If your measurements fall between two sizes, choose the larger size

• For skirts, pants and shorts, choose size by the hip measurement for women

• For men, pants, shorts sizes are chosen by waist measurement

Sew Happy,
Suzie

Monday, October 25, 2010

Grandma's Combination Cookies

I do hope all had a WONDERFUL WEEKEND!!
I know that we sure did.
One of our favorite things to do on Sunday nights
is to make something yummy.
These cookies are right at the top of the list.
This was my mom's recipe
and when I was growing up
It was not uncommon to come home
from school and find a huge batch
of these babies
waiting with ice cold milk.
Pure HEAVEN!!
They are called a combination cookie
because you can put any combination of
goodies inside the cookie to to make
all sorts of great cookies.
The ones pictured are plain milk chocolate chip.
My mom used to put coconut, chocolate chips
and some kind of nut in them as a rule.
Be creative.
Use M&Ms, raisins, nuts, dried cranberries,
chocolate chips, coconut, or anything your heart desires.
These are by far the best cookie I've ever had but, then again, I'm pretty biased on that count.
Fall is a great time to start baking for the holidays and these cookies
freeze like a dream
Doubling or even tripling the batch can get you a long way in putting together those goodie plates for neighbors and friends and you can do them well in advance!
If you try them, I would love to hear what you put in them and how you like them. 

You will need:
*1 cup of brown sugar
*1 cup of white sugar
*1 cup of shortening (use the good stuff, not a store brand, and can be buttered flavored if you wish)
*2 eggs
*3 tablespoons hot water
*2-1/2 cups of flour, sifted
*2 teaspoons baking soda
*1/2 teaspoon of salt
*1-2/3 cups oatmeal (this was my mom's sneaky way of getting oatmeal into us)
*1 teaspoon vanilla (use the pure vanilla, not the immitation vanilla)
*1-1/2 cups of add-ins (basically anything you want to total about 1-1/2 cups)

Cream shortening and sugars together.  Add eggs one at a time mixing each carefully.  Sift flour, soda and salt together.  Add to sugar mixture.  Mix well.  Add hot water and vanilla.  Mix.  Add oatmeal and add-ins.  Mix well.  Use a cookie scoop to place balls of dough on a cookie sheet (aprox 1-1/2 inch balls).  We always put parchment paper on our cookie sheets, especially if we are using one of the battle scarred ones. :)  Bake at 350 degrees for about 7-8 minutes.  Now, 7 minutes (at least in our oven) produces a soft, chewy cookie.  You will need to experiement a bit with your own oven to determine what kind of cookie you want and how long to bake them. This will make about 3-4 dozen cookies depending on the size you make them. 

Please let me all know what you put in them and how you like them.  I would LOVE to hear about them.

*  Ammended the item "soda" to "baking soda" for clarity - 11/01/2010. 
Thanks whoever pointed that out to me!
Sew Happy... er...Bake Happy,
Suzie
I'm linked up to these parties
handmade projects


Friday, October 22, 2010

Fiber Friday -- Silk

Cool picture, huh? That is a silk cocoon sitting on a bed of silk threads. Looks like hair doesn’t it. See how fine and shiney it is? Let’s find out some more about this beautiful fiber.

I have not really had any experience with silk finding it rather cost prohibitive for me. However, I have owned silk clothing. In fact, I have a beautiful skirt made of silk haning in my closet now (a fabulous buy at $4.00 on a sale rack). I love its softness and drape, but really hate that it is dry clean only. Silk is a beautiful fabric found in may weights and weaves. So, here is a bit about silk and how to sew it. I may just save up and give it a try one of these days.

Fun Facts
The offical name for silk production is sericulture.

This fiber was invented in China many centuries ago. In fact, it was kept a secret from the world for hundreds of years even to the point of exicuting anyone accused of smuggling it or its processing procedure out of the country.

Only Chinese rulers and high ranking officials were allowed to wear silk at one time.

China produces aproximately half of all the silk made in the world.

The silk worm come from the Bombyx moth that is blind and cannot fly.

A moth will lay aproximately 500 eggs over a period of 4-6 days.

It takes 30,000 worms to produce just 12 pounds of raw silk.

The average silk worm will eat 2,000 pounds of chopped mulberry leaves and is fed every half hour around the clock.

Mulberry-fed worms produce a silk that is more uniform in color, size, shape and much smoother and finer than the silk produced by wild worms.

Silk worms are pampered quite a bit by maintaining a controlled environment. Temperatures are kept at 65 degrees and gradually warmed to 77 degrees. They are sheilded from strong light, loud noises and strong odors such as human sweat.

It takes 3-4 days for a worm to spin its cocoon.

The silk fiber is lightweight, resilient and extremely strong. In fact, it is much stronger than a steel filament of the same size.

So, there you go. Is it any wonder that stuff costs big buck?? Now, on to sewing.

Sewing with Silk

Silk often shifts, snags and puckers when stitched. Here are some helps for handling and sewing silk.

For lightweight silks, you can preshrink them by hand washing them and hanging them to dry. After sewing, you can continue to hand wash. Shampoo is noted to be the best hand washing soap for silk. If you want to color set you silk, use shampoo designed for color treated hair. Cool, huh?

Use very small, fine sewing needles in your machine. Make sure the needle is very sharp.

The same with pins, use only very fine, sharp pins. Buy new ones if you are in doubt about the condition of your pins.

Interface with a sew in interfacing, preferably silk organza (hand wash that too). Heavier silks may or may not use iron-on interfacing. Test it out first before hand.

Cutting can be difficult as it is slippery and tends to shift quite a bit. Lay a layer of tissue paper down on cutting surface, lay down your fabric and then place your pattern pinning it in place. Cut through all layers. This will keep the fabric together and increase the accuracy of each cut.

Sew Happy!

Suzie


Friday, October 15, 2010

Fiber Friday -- Linen

This Friday it's Linen.  I love, love, love linen! 
This is a wonderful fiber.
Soft, clean, durable.
The more you wear it, the more softer it becomes.
Sounds like you favorite jeans, right?
Well, linen is a natural fabric that behaves like cotton in many respects.
It also absorbs about 20% of its weight in moisture and has an ability to release the moisture into the air making the fabric feel dry.
What a great fabric for this Arizona heat!
Like cotton, it is very durable.
Even the finest of linen yarns must be durable to endure being woven on high-speed looms used today.
Well, here are some interesting facts about linen.


*Most of the world’s flax (the plant that linen comes from) is grown in Western Europe.
*The flax plant grows to 20-40 inches in height.
*Flax is harvested by pulling the plant out of the ground rather than cutting of the stalk.
This is to preserve the plant for its entire use as flax is used for more than just linen production.
*Flax is processed into linen by first spreading out the plants in a large, open field to lay in the sun and collect rain and dew from the atmosphere.
This process is called retting.
The moisture breaks down the pectin in the stem that holds the fibers together,
hence, making it easier to separate the fibers for spinning.
It is then stripped and debris is combed out of the fibers.
 Fibers are then separated into lengths and graded with the longest
being the finest and strongest, the shorter graded lower.
It is then spun into lengths of fiber used in the weaving process. After weaving, it is bleached (cleansed with chemicals) for dyeing/printed. It is at this point that it may be given a finish to reduce wrinkling.
*Linen wrinkles easily.
In fact, it can be almost impossible to get wrinkles entirely out of the fabric.
To press in creases or set pleats, use a solution of 50/50 water and white vinegar and press.
Let set untouched for a few hours until completely dry.
*Pretreat linens in the same manner you plan on caring for your garment after sewing.
*Linen also has a tendency to shrink,
so it is recommended to pretreat it 3 times before cutting.
This will soften up the linen and you will know exactly how
the fabric will perform in your garment. If you want to maintain crispness,
have your linen fabric dry cleaned
making sure to always dry clean your garment.
*Linen is an easy fabric to cut, layout and sew,
much like cotton and cotton/poly blends.
Use a 100% cotton or poly/cotton thread.
 Interfacing may be woven or fusible
as a matter of preference and project suitability.
*Seams should be finished to prevent fraying.
Use a zigzag, hand overcast, seam binding finish as desired.

Linen clothing is usually loose in fit and simple in design making for
really nice casual wear with the design intended to take full advantage of its wrinkles.
With that in mind, I think I’ll keep an eye out for a piece of linen to work on soon.

Sew Happy,
Suzie

Tuesday, October 12, 2010

Introducing....THE SUZIE BAG

So, here it is!
The Suzie Bag

This has been a labor of blood, sweat and tears
for many, many months.

I just finished and posted my first bag
on
Etsy.


Sew Happy,
Suzie


Monday, October 11, 2010

Basic Burp Cloth Tutorial

I hope everyone had a super weekend. 
I know I did.
It just
went
too
fast.
Sigh.....
But I did do some
 web surfing this weekend.
I happened upon Lemon Tree Creations and a great post by
Erin
about Burp Cloths. 
She did a great job describing her process.
Burp cloths can be tricky and she asked for
some seasoned seamstresses to give some additional
tips to sewing a burp cloth.
I attempted to post a comment and really
did not feel like I had done a clear enough job.
So, she inspired me to put together
 this little tutorial. 
 So, this tute is dedicated to Erin at Lemon Tree Creations and all
those out there that would appreciate some additional tips.
Erin, you rock! 
Thanks for the wonderful tutorial.
Hopefully, I can only add to what you have already explained.

 You will need:
*prefolded, prewashed and dried cloth diaper
*100% cotton fabric, about 20"x8.5" (this is pretty generous)
*matching thread
*poster board, about 18.5" x 4.5"
*walking foot (not required, but very helpful)
*spray starch
*iron
*pins

First, I want to stress the importance of
prewashing and drying
both the fabric and the diaper
Cotton is an ideal
fabric for burp cloths because of its absorbt quality
and softness agains
baby's skin.
For more about cotton, look here for
my article about cotton.
Washing and drying will preshrink the fabric.
The last thing you want is to wash such a labor of love
only to find that the cotton has shrunk and you have a puckered mess.
Yuck!
So, don't be tempted to skip this step.

However,
the diaper is going to feel limp and poorly shaped,
not ideal if you want a
 nice,
 neat
finished product.
That's when I pull out the spray starch and my iron.
Iron the diaper with a light spray of starch
and shape it into a nice square.
This will give you a really nice base to work with. 
The diaper weave is rather loose
and can shift
so
easily
that anything you can do
to keep that shifting from happening
will be
worth
the
extra
effort.
Cut an 8.5" x 20" piece of fashion fabric. 
Press and lightly starch this also.
Previously,
I cut a template out of poster board measuring
20"x8.5"
This is large enough to give me lots of
wiggle room
as I'm fitting the panel of fabric on
diapers that can
vary a tad in size.
With the fashion fabric wrong side up,
center the poster board template
on the fashion fabric.
Using the iron,
press up the long sides along
the template on both sides. 
This will help you create
an even, neat panel of fabric.
Fold up the ends in the same manner with one end
without
a permanent crease just yet.
This one end will be your
"adjusting"
end.
When you have made the proper length adjustment,
you can press that end.

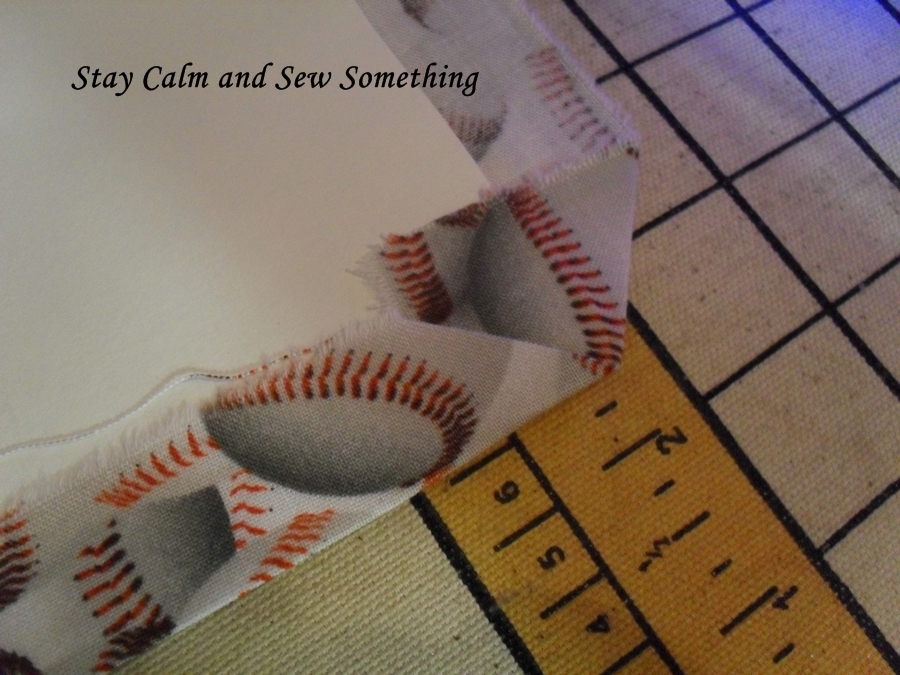
Now for the corners. 
Diagonally
 fold a corner of the fabric
onto the template.

Fold the side fold and top folds
 onto the corner so you have a nice
sharp corner.
This picture probably illustrates better
what I'm trying to say.
You will have nice points on all four corners.
Flip it over,
center it on the diaper
and pin down
adjusting
the
placement
of the diaper as you go.
One one end,
you will see an overhang of fabric.
Pin mark this,
take it to the ironing board and press the
end to the proper adjustment to fit.
Go back and pin the fabric all back on the diaper
making sure it is
positioned the way you want it. 
Don't
be
afraid
to
use
pins.
They will help control the fabrics and
hold them in the correct
position of sewing.
Now, here's my secret weapon. 
My walking foot.
I do hope that you have one and use it. 
If you don't
you are really missing out.
If you don't have one,
get one to fit your machine
and use it.
You will be glad you did.
 A walking foot helps to feed both layers of fabric
 under the pressure foot
more evenly
 and there won't be that
"slide"
between layers that can cause
puckers,
difference in layer lengths,
stretching of fabrics and such.
When you are working with diapers and their loose weave,
this will be a lifesaver.
Load the walking foot according to your machine's instructions.

And begin to sew. 
Go
SLOW! 
You just can't rush a walking foot
or a project that you want to turn out especially nice.
Take care to stitch fairly close
to the edge of fabric evenly.
Slowing down gives you the
control you need to do this.
Make sure to do a pivot at each corner
and go all the way around
the square. 
 Do a small backstitch.

 Go back to the ironing board and press the diaper and fabric
flat
and
smooth
again. 
 I don't know that you can see
really clearly, but one side of the diaper is pressed in the picture above
and one side isn't. 
Can you see the difference? 
Pressing makes a great presentation and makes you
work look
professional.
So, lets review. 
*Press with a light coat of starch. 
*Use a template to help create a straight, even panel
*Pin, pin, pin.
*Use a walking foot if you possibly can
*Take your time and SLOW DOWN!
* Press, press, press
 These little hints will make your burp cloths
look perfessional.
Etsy ready!
Gift ready!
Great!

 Sew Happy,
Suzie

I ATTENDED THESE PARTIES AND MORE ON MY LINKY PAGE


mmm button


Texas Monkey


Keeping It Simple
Making


Photobucket
Photobucket

Monday, October 4, 2010

What I've Been Up To

Thank you all for the sweet comments about my tutes. 
You all ROCK
It's exciting to see the number of visits I have. 
Keep them coming. Love them!
And silly me, sorry for any confusion about the skirt in my
Homecoming Dress Makeover Tutorial. LOL!
The skirt actually had 4 layers,
the black lace which was sheer,
an underling for that lace for modesty,
the net ruffle for fulllness and
a layer under that so it wouldn't scratch the skin.
There was a lot going on with that skirt.
Each were cut individually to the length I needed plus the seam allowance at the top.
I stitched all layers together at the waist seam before sewing it to the bodice to
just make handling all those layers easier.
Yes, it is possible to do something to create modesty and style.
Give it a try sometime.
And I will get better at tutorials as I go along.
I promise! LOL!
This weekend, I worked on some new items for my Etsy Shop
I do hope you all take a look at what I have to offer. 
Every item is made with lots of love! LOL. 


Sew Happy,
Suzie

Friday, October 1, 2010

Fabric Friday -- Cotton


I am dedicating each Friday to posting interesting facts about the fibers that make up today’s fabrics. These are the fibers that we sew with, so it seems reasonable to learn about them and how to best handle and care for them. Let's start off with...
COTTON
Interesting Facts:
  • Know as “white gold
  • In the 1700s it was illegal in England to import and manufacture cotton into fabric in order to protect their sheep and wool industry and ultimately to keep it away from the American Colonies.
  • An experienced laborer could pick about 450 lbs of cotton by hand in one day
  • With the advent of the cotton picker in the 1930s by the Rust Brothers from Mississippi, cotton could be picked at a rate of 8000 lbs a day. 
  • The US produces 3/4 of the world’s cotton.   
  • More clothing is made from cotton than any other fiber in the world. 
  • Annually textile mills produce over 8 billion square yards of woven cotton fabric and 3 billion square yards of knit fabric.  
  • It absorbs 27 times its weight in moisture.
  • It is durable and strong, comfortable to wear and easy to launder making it a popular clothing choice. 
  • Cotton clothing washed in cold water keep their colors longer
  • Resists abrasion, pilling and moths. 
  • Woven cotton fabric is an excellent choice for the beginning seamstress because it is so easy to cut and sew. 
  • For more information on Cotton check out the National Cotton Council of America’s website at http://www.cotton.org/

Sew Happy,
Suzie

LinkWithin

Related Posts Plugin for WordPress, Blogger...