I hope everyone had a super weekend.
I know I did.
It just
went
too
fast.
Sigh.....
But I did do some
web surfing this weekend.
She did a great job describing her process.
Burp cloths can be tricky and she asked for
some seasoned seamstresses to give some additional
tips to sewing a burp cloth.
I attempted to post a comment and really
did not feel like I had done a clear enough job.
So, she inspired me to put together
those out there that would appreciate some additional tips.
Thanks for the wonderful tutorial.
Hopefully, I can only add to what you have already explained.
You will need:
*prefolded, prewashed and dried cloth diaper
*100% cotton fabric, about 20"x8.5" (this is pretty generous)
*matching thread
*poster board, about 18.5" x 4.5"
*walking foot (not required, but very helpful)
*spray starch
*iron
*pins
First, I want to stress the importance of
prewashing and drying
both the fabric and the diaper.
Cotton is an ideal
fabric for burp cloths because of its absorbt quality
and softness agains
baby's skin.
For more about cotton, look
here for
my article about cotton.
Washing and drying will preshrink the fabric.
The last thing you want is to wash such a labor of love
only to find that the cotton has shrunk and you have a puckered mess.
Yuck!
So, don't be tempted to skip this step.
However,
the diaper is going to feel limp and poorly shaped,
not ideal if you want a
nice,
neat
finished product.
That's when I pull out the spray starch and my iron.
Iron the diaper with a light spray of starch
and shape it into a nice square.
This will give you a really nice base to work with.
The diaper weave is rather loose
and can shift
so
easily
that anything you can do
to keep that shifting from happening
will be
worth
the
extra
effort.
Cut an 8.5" x 20" piece of fashion fabric.
Press and lightly starch this also.
Previously,
I cut a template out of poster board measuring
20"x8.5"
This is large enough to give me lots of
wiggle room
as I'm fitting the panel of fabric on
diapers that can
vary a tad in size.
With the fashion fabric wrong side up,
center the poster board template
on the fashion fabric.
Using the iron,
press up the long sides along
the template on both sides.
This will help you create
an even, neat panel of fabric.
Fold up the ends in the same manner with one end
without
a permanent crease just yet.
This one end will be your
"adjusting"
end.
When you have made the proper length adjustment,
you can press that end.
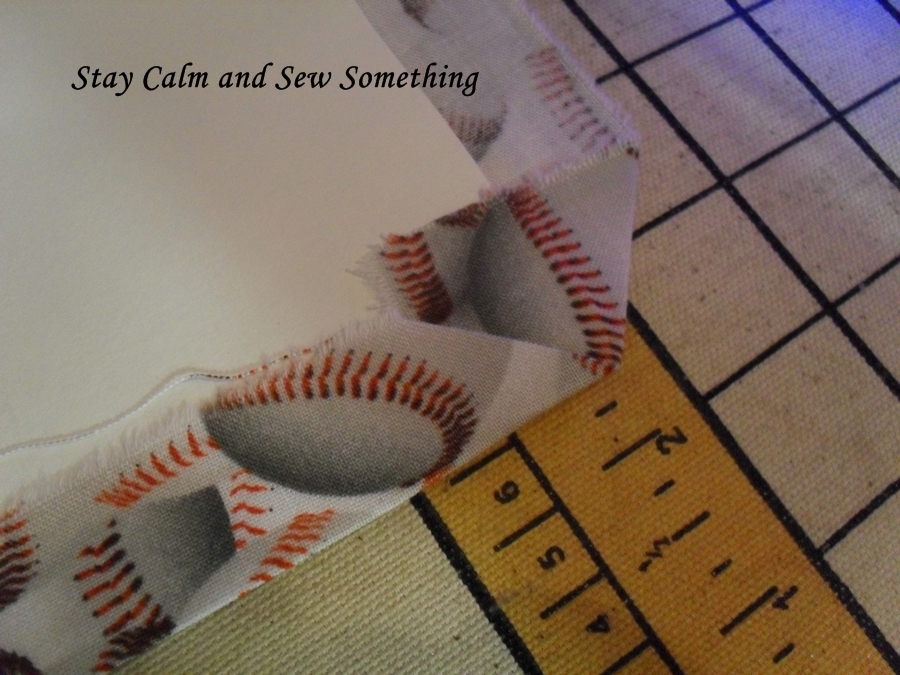
Now for the corners.
Diagonally
fold a corner of the fabric
onto the template.
Fold the side fold and top folds
onto the corner so you have a nice
sharp corner.
This picture probably illustrates better
what I'm trying to say.
You will have nice points on all four corners.
Flip it over,
center it on the diaper
and pin down
adjusting
the
placement
of the diaper as you go.
One one end,
you will see an overhang of fabric.
Pin mark this,
take it to the ironing board and press the
end to the proper adjustment to fit.
Go back and pin the fabric all back on the diaper
making sure it is
positioned the way you want it.
Don't
be
afraid
to
use
pins.
They will help control the fabrics and
hold them in the correct
position of sewing.
Now, here's my secret weapon.
My walking foot.
I do hope that you have one and use it.
If you don't
you are really missing out.
If you don't have one,
get one to fit your machine
and use it.
You will be glad you did.
A walking foot helps to feed both layers of fabric
under the pressure foot
more evenly
and there won't be that
"slide"
between layers that can cause
puckers,
difference in layer lengths,
stretching of fabrics and such.
When you are working with diapers and their loose weave,
this will be a lifesaver.
Load the walking foot according to your machine's instructions.
And begin to sew.
Go
SLOW!
You just can't rush a walking foot
or a project that you want to turn out especially nice.
Take care to stitch fairly close
to the edge of fabric evenly.
Slowing down gives you the
control you need to do this.
Make sure to do a pivot at each corner
and go all the way around
the square.
Do a small backstitch.
Go back to the ironing board and press the diaper and fabric
flat
and
smooth
again.
I don't know that you can see
really clearly, but one side of the diaper is pressed in the picture above
and one side isn't.
Can you see the difference?
Pressing makes a great presentation and makes you
work look
professional.
So, lets review.
*Press with a light coat of starch.
*Use a template to help create a straight, even panel
*Pin, pin, pin.
*Use a walking foot if you possibly can
*Take your time and SLOW DOWN!
* Press, press, press
These little hints will make your burp cloths
look perfessional.
Etsy ready!
Gift ready!
Great!
Sew Happy,
Suzie
I ATTENDED THESE PARTIES AND MORE ON MY LINKY PAGE 




 To add a bit of contrast and interest, I took an even narrower strip of a
